
A Guide to Scraping Contact Information For Sales and Marketing
Web scraping or web data scraping is a host of techniques that allow users to extract data from web documents such as html or XML in an automated way. Data scraping has many uses encompassing any time you need data (particularly in bulk) that is published online. While data scraping may sound technical, there are many entry points ranging from a simple click to writing scripts or using entire suites of commercial software. In this walk through we’re going to be looking at a few of the more user-friendly tools for data scraping. All three of these tools may be used with but rudimentary knowledge of html, though users who are fluent in css and regular expressions will be able to use the following scrapers for a greater range of scenarios. Besides providing a basic tutorial on the following three data scraping tools, we’re going to focus on applying these data scrapers to common sales and marketing scenarios. Namely, using scrapers to locate contact information including email addresses, phone numbers, and comment boxes. Check out our three data scraping methods for contact information below!
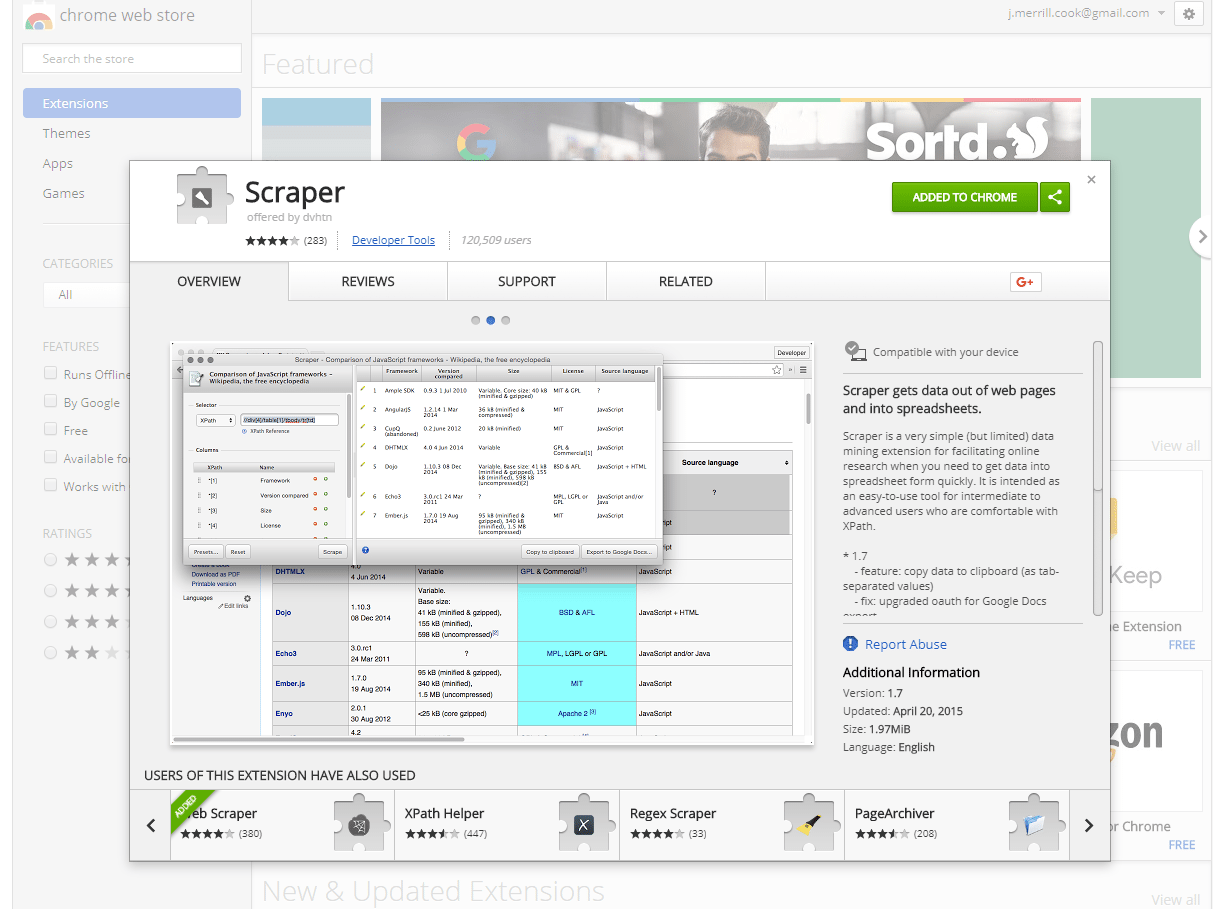 This Chrome plugin (also usable on Firefox, Vivaldi, and Opera) known simply as “Scraper” affords those with a complete lack of developer skills to grab a wide range of web page elements and quickly copy them to a clipboard. Intermediate and advanced users who know some XPath or jQuery will be capable of extending the range of items that Scraper can grab. First, navigate over to the Chrome Web Store and hit the “add to chrome” button. This step is the same for installing the extension on Chrome, Vivaldi, and Firefox. Unlike a number of other extensions, there’s no icon in the task bar for this extension. Rather you’ll notice that a new option has been added to your menu when you right click on a web page noting “scrape similar.”
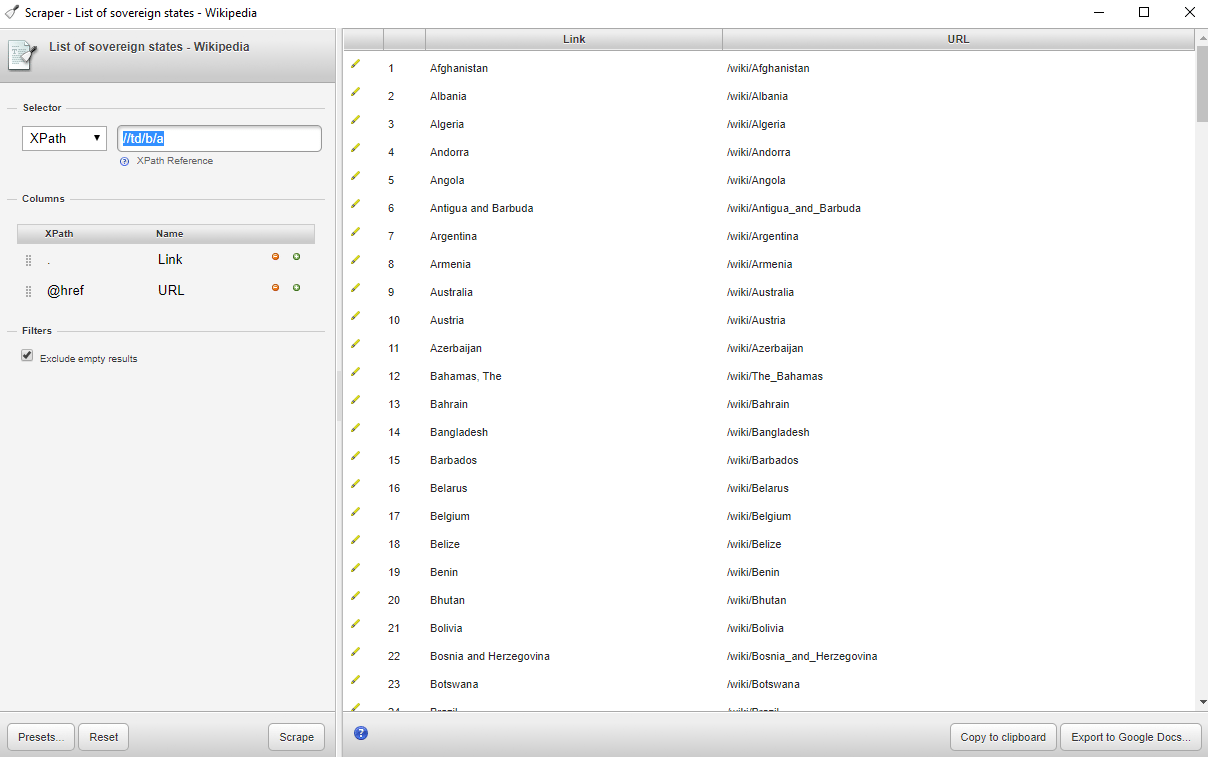
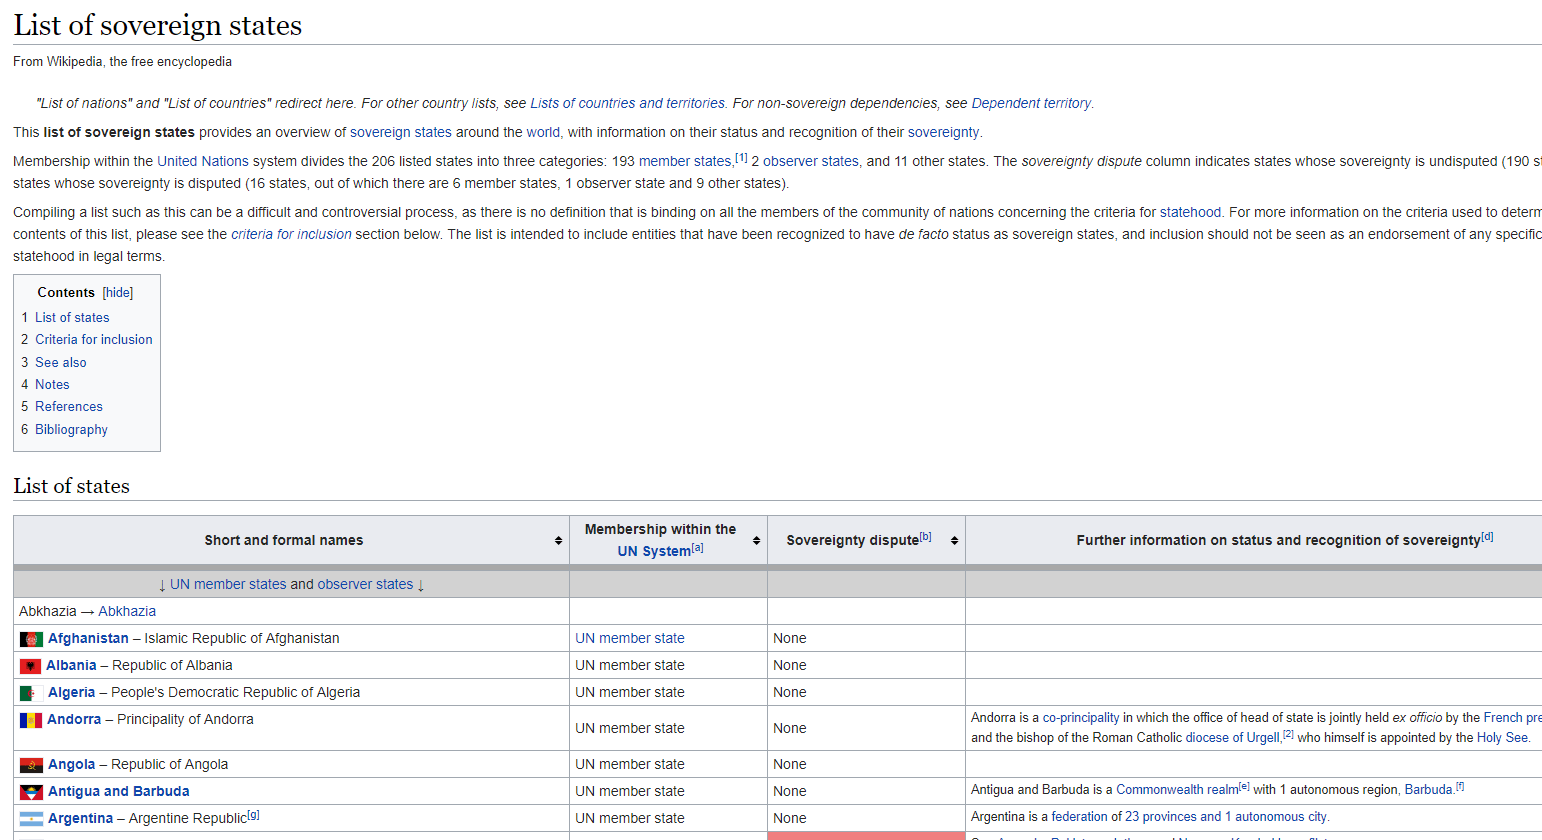 For simplicity’s sake (and so as not to overload any one site’s point of contact) we’re going to look at scraping the Wikipedia page that is a list of sovereign states. This page has a large table of nation states from the around the world, with related information such as notes on if their sovereignty is disputed, if they are a member of the United Nations, and additional points of interest. If you start with a right click on the name of the first nation with a flag next to it — in my case that’s Afghanistan — you’ll notice the newly added option to “scrape similar.” After clicking “scrape similar” you should note a new popup window with a small spreadsheet inside of it. If the nation you clicked you “scraped similar” from was a link you should receive two columns and 206 rows: the name of the nation and a relative URL to the wikipedia entry on that nation.
For the most un-tailored scrapes that this scraper can achieve, that’s all there is to it. You can click the “copy to clipboard” button and continue in a spreadsheet with your newly scraped information. Without further tailoring your selection, many scrapes will work as you would have them with this extension. Many, however, will not. In what follows we will detail ways in which a total beginner or someone with a very basic knowledge of HTML can get most of what this scraper has to offer.
For simplicity’s sake (and so as not to overload any one site’s point of contact) we’re going to look at scraping the Wikipedia page that is a list of sovereign states. This page has a large table of nation states from the around the world, with related information such as notes on if their sovereignty is disputed, if they are a member of the United Nations, and additional points of interest. If you start with a right click on the name of the first nation with a flag next to it — in my case that’s Afghanistan — you’ll notice the newly added option to “scrape similar.” After clicking “scrape similar” you should note a new popup window with a small spreadsheet inside of it. If the nation you clicked you “scraped similar” from was a link you should receive two columns and 206 rows: the name of the nation and a relative URL to the wikipedia entry on that nation.
For the most un-tailored scrapes that this scraper can achieve, that’s all there is to it. You can click the “copy to clipboard” button and continue in a spreadsheet with your newly scraped information. Without further tailoring your selection, many scrapes will work as you would have them with this extension. Many, however, will not. In what follows we will detail ways in which a total beginner or someone with a very basic knowledge of HTML can get most of what this scraper has to offer.
 Once you’ve scraped this entry and the corresponding popup has emerged, note that the top left hand corner of the popup contains a section on the “selector” used to scrape the information we’ve selected. This may look foreign unless you have know XPath or have some HTML knowledge. But let me just step you through what is going on here as it should help to inform users without knowledge of those things why this scraper may sometimes work in ways they aren’t expecting.
The values in the “selector” box include “//td/b/a” which is an XPath query, and otherwise recognizable as three HTML elements. The text we originally selected was inside of a table, which in html is constructed using <td> elements (or table data), every “box” in the table is surrounded by <td></td> html tags, and so an initial XPath query of “//td” would return the values in every one of the boxes of the table. You can try this out by simply editing the “selector” box to hold “//td.”
In our initial scrape, however, note that we only received values for the first column in the table, as well as the the URLs of those nation entries. XPath works by traversing from a general query to a more specific query. Every ensuing page element after a slash will prompt the scraper to look for whatever that second element is from among the data gathered from the first element. The third element will search for data matching it’s type from within the second, and so forth. In this case the scraper located every element in a cell in the table (“//td”) and then looked for every one of those elements that was bolded (“<b></b>” in HTML). Quickly scrolling through the table one can see that only the first column of the table is visibly bolded. Thus the XPath query of “//td/b” actually returns what we were seeking. The additional element in the query (“/a”) refers to the HTML element for an anchor, or a link. In HTML this element looks like <a href=”YourLink.com”>Link Text</a>. In some ways this scraper is smart. Or at least opinionated, in that it decided to automatically query the element that contains all that we could possible want from right clicking on an entry that is a bolded link in the first column. Links are one of the few elements this scraper will automatically pull out if you originally right click and “scrape similar” from a link. Note that some email addresses are hidden in links in the form of
<a href=”mailto:youremailaddress”>Email Me</a>. So if the first column of the table we’ve scraped thus far contained links meant to open an email window, we would receive the text of the link along with “mailto:youremailadress.” With a little spreadsheet knowledge it’s easy to remove “mailto:” and you’ve got your addresses.
For those with knowledge of HTML some basic syntax of XPath should be enough to carry you through to utilize most of the usefulness of this scraper. Here are two of the best cheat sheets on XPath we’ve found. Note that all queries start with a double forward slash, and may be used with only elements familiar to HTML or with a wide array of functions and regular expression-like syntax.
Once you’ve scraped this entry and the corresponding popup has emerged, note that the top left hand corner of the popup contains a section on the “selector” used to scrape the information we’ve selected. This may look foreign unless you have know XPath or have some HTML knowledge. But let me just step you through what is going on here as it should help to inform users without knowledge of those things why this scraper may sometimes work in ways they aren’t expecting.
The values in the “selector” box include “//td/b/a” which is an XPath query, and otherwise recognizable as three HTML elements. The text we originally selected was inside of a table, which in html is constructed using <td> elements (or table data), every “box” in the table is surrounded by <td></td> html tags, and so an initial XPath query of “//td” would return the values in every one of the boxes of the table. You can try this out by simply editing the “selector” box to hold “//td.”
In our initial scrape, however, note that we only received values for the first column in the table, as well as the the URLs of those nation entries. XPath works by traversing from a general query to a more specific query. Every ensuing page element after a slash will prompt the scraper to look for whatever that second element is from among the data gathered from the first element. The third element will search for data matching it’s type from within the second, and so forth. In this case the scraper located every element in a cell in the table (“//td”) and then looked for every one of those elements that was bolded (“<b></b>” in HTML). Quickly scrolling through the table one can see that only the first column of the table is visibly bolded. Thus the XPath query of “//td/b” actually returns what we were seeking. The additional element in the query (“/a”) refers to the HTML element for an anchor, or a link. In HTML this element looks like <a href=”YourLink.com”>Link Text</a>. In some ways this scraper is smart. Or at least opinionated, in that it decided to automatically query the element that contains all that we could possible want from right clicking on an entry that is a bolded link in the first column. Links are one of the few elements this scraper will automatically pull out if you originally right click and “scrape similar” from a link. Note that some email addresses are hidden in links in the form of
<a href=”mailto:youremailaddress”>Email Me</a>. So if the first column of the table we’ve scraped thus far contained links meant to open an email window, we would receive the text of the link along with “mailto:youremailadress.” With a little spreadsheet knowledge it’s easy to remove “mailto:” and you’ve got your addresses.
For those with knowledge of HTML some basic syntax of XPath should be enough to carry you through to utilize most of the usefulness of this scraper. Here are two of the best cheat sheets on XPath we’ve found. Note that all queries start with a double forward slash, and may be used with only elements familiar to HTML or with a wide array of functions and regular expression-like syntax.
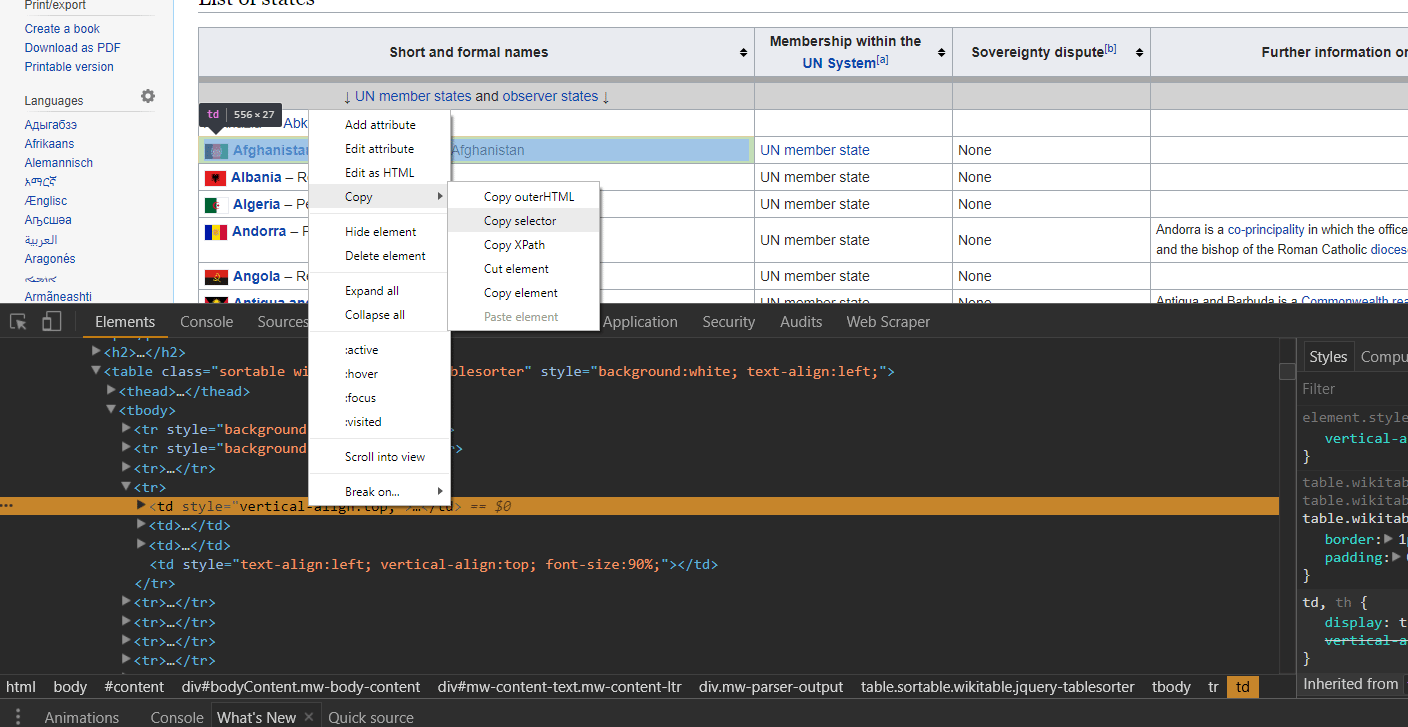 One further tip, that most users with some familiarity on how sites are structured probably know involves the use of developer tools. Developer tools are available in all modern browsers, and certainly available in all of the browsers that this web scraper works for. If your initial scrape does not work as expected due to the “selector” not latching on to what you think it should, your next best bet is to right click and “inspect element.” This open developer tools (also known as Firebug in Firefox) which provides an interactive view of the rendered HTML where you right clicked. Upon moving your mouse around the HTML elements in dev tools, portions of the page will become highlighted, giving you a view of what selectors may work to provide a selector that works for this scraper. As seen in the picture above, right clicking on the html element you would like to scrape as it is represented in developer tools provides the option to “copy selector.” If you’re familiar with jQuery and would rather use jQuery style selectors, simply toggle the drop down menu next to selector in the scraper popup window.
 This scraper is also an extension, though only works on the Chrome Browser. Navigate to the extension’s homepage in the Chrome Web Store to integrate the extension with your browser. Once the extension is activated, proceed to the hub for portals on Wikipedia, where we will step through an example of using this scraper together. This scraper is located in the developer tools section of Chrome, so first right click on the page we’re scraping and select “inspect.” Alternatively, one can click ctrl+shift+i if on Windows.
 If you’ve spent any time in developer tools you might notice that a new tab has been added titled “Web Scraper.” Click this tab to begin. The first step to using the Web Scraper is establishing a sitemap. Toggle the drop down menu from the “New Sitemap” tab and select “Create Sitemap.” Name your sitemap something recognizable in the event that you might want to utilize the site map again. Also, if you download elements locally such as images you’re scraping, the elements will be stored in a sub-directory of your downloads folder named after the sitemap. Then enter the URL where you would like to begin your scrape in the “Start URL” field. Click “Create Sitemap” and we’re ready to go.
 Next we’re going to have to ascertain what we are trying to scrape. Presently there is a row of blue buttons relating to general portal topics close to the top center of the page. If you click through a few you will note that they are links to separate pages, and the resulting pages all follow the same general styling and format. This choice is arbitrary, yet you can probably imagine a fundamentally similar organizational scheme for scraping prices or details about products from an e-commerce site, or scraping email contacts from a directory of workers.
In the “Sitemap” drop down menu click on “selectors” (familiar from the last scraper, right?). You should see the header for a table with an “add selector” button. Note that we are at the “/root” of the scraper, and click “add selector.” The “/root” here means that we are starting from the most general node of the rendered HTML on the page you established as the “Start URL.” For this example, let’s make a scraper that clicks through all of the category links in the top-center of the page, and grabs the location of the first image in the description text.
Next we’re going to have to ascertain what we are trying to scrape. Presently there is a row of blue buttons relating to general portal topics close to the top center of the page. If you click through a few you will note that they are links to separate pages, and the resulting pages all follow the same general styling and format. This choice is arbitrary, yet you can probably imagine a fundamentally similar organizational scheme for scraping prices or details about products from an e-commerce site, or scraping email contacts from a directory of workers.
In the “Sitemap” drop down menu click on “selectors” (familiar from the last scraper, right?). You should see the header for a table with an “add selector” button. Note that we are at the “/root” of the scraper, and click “add selector.” The “/root” here means that we are starting from the most general node of the rendered HTML on the page you established as the “Start URL.” For this example, let’s make a scraper that clicks through all of the category links in the top-center of the page, and grabs the location of the first image in the description text.
 To add our first selector, we’ll name it “button click” and we’ll toggle the “type” to “link.” Notice that there is also an “element click” option, which is similar though more tailored to clickable elements that change the page layout but keep you on the same page in the end. To fill out the remainder of the form, toggle “multiple” to denote we would like for there to be multiple clicks if they are available. Then click “element preview” then “select.” Note that a small input window pops up. If you know the selector you would like to use, you may manually enter it here. Otherwise, the “element preview” option allows you to move your mouse around the web page and see potentially selected elements. You’ll want to start by clicking on the button farthest left in the row we’re trying to select, and then click one button to the right. This should first provide a selector tailored to the first button of this type, but then generalize the selector to call for all buttons of this type. You should see all buttons in the row outlined in red, the visual product of the “element preview” option. One final note, you can specify the number of milliseconds you would like to wait between clicks in the “delay” option box. Particularly as scraping projects get larger or are downloading substantial amounts of information, this is important. Too many requests in specific time frames lead to servers cutting off your connection, or you may get faulty data if you do not allow enough time for each step of the scrape to load. For our purposes i’ll set this to 500, or half a second.
Click “save selector,” and we’ve got our first selector! To recap, this selector will find every button of the type specified, which happens to be the entire top-center row of categories on Wikipedia’s portal page. It will click all of them and load the page. Now to specify what happens on those newly opened pages.
To add our first selector, we’ll name it “button click” and we’ll toggle the “type” to “link.” Notice that there is also an “element click” option, which is similar though more tailored to clickable elements that change the page layout but keep you on the same page in the end. To fill out the remainder of the form, toggle “multiple” to denote we would like for there to be multiple clicks if they are available. Then click “element preview” then “select.” Note that a small input window pops up. If you know the selector you would like to use, you may manually enter it here. Otherwise, the “element preview” option allows you to move your mouse around the web page and see potentially selected elements. You’ll want to start by clicking on the button farthest left in the row we’re trying to select, and then click one button to the right. This should first provide a selector tailored to the first button of this type, but then generalize the selector to call for all buttons of this type. You should see all buttons in the row outlined in red, the visual product of the “element preview” option. One final note, you can specify the number of milliseconds you would like to wait between clicks in the “delay” option box. Particularly as scraping projects get larger or are downloading substantial amounts of information, this is important. Too many requests in specific time frames lead to servers cutting off your connection, or you may get faulty data if you do not allow enough time for each step of the scrape to load. For our purposes i’ll set this to 500, or half a second.
Click “save selector,” and we’ve got our first selector! To recap, this selector will find every button of the type specified, which happens to be the entire top-center row of categories on Wikipedia’s portal page. It will click all of them and load the page. Now to specify what happens on those newly opened pages.
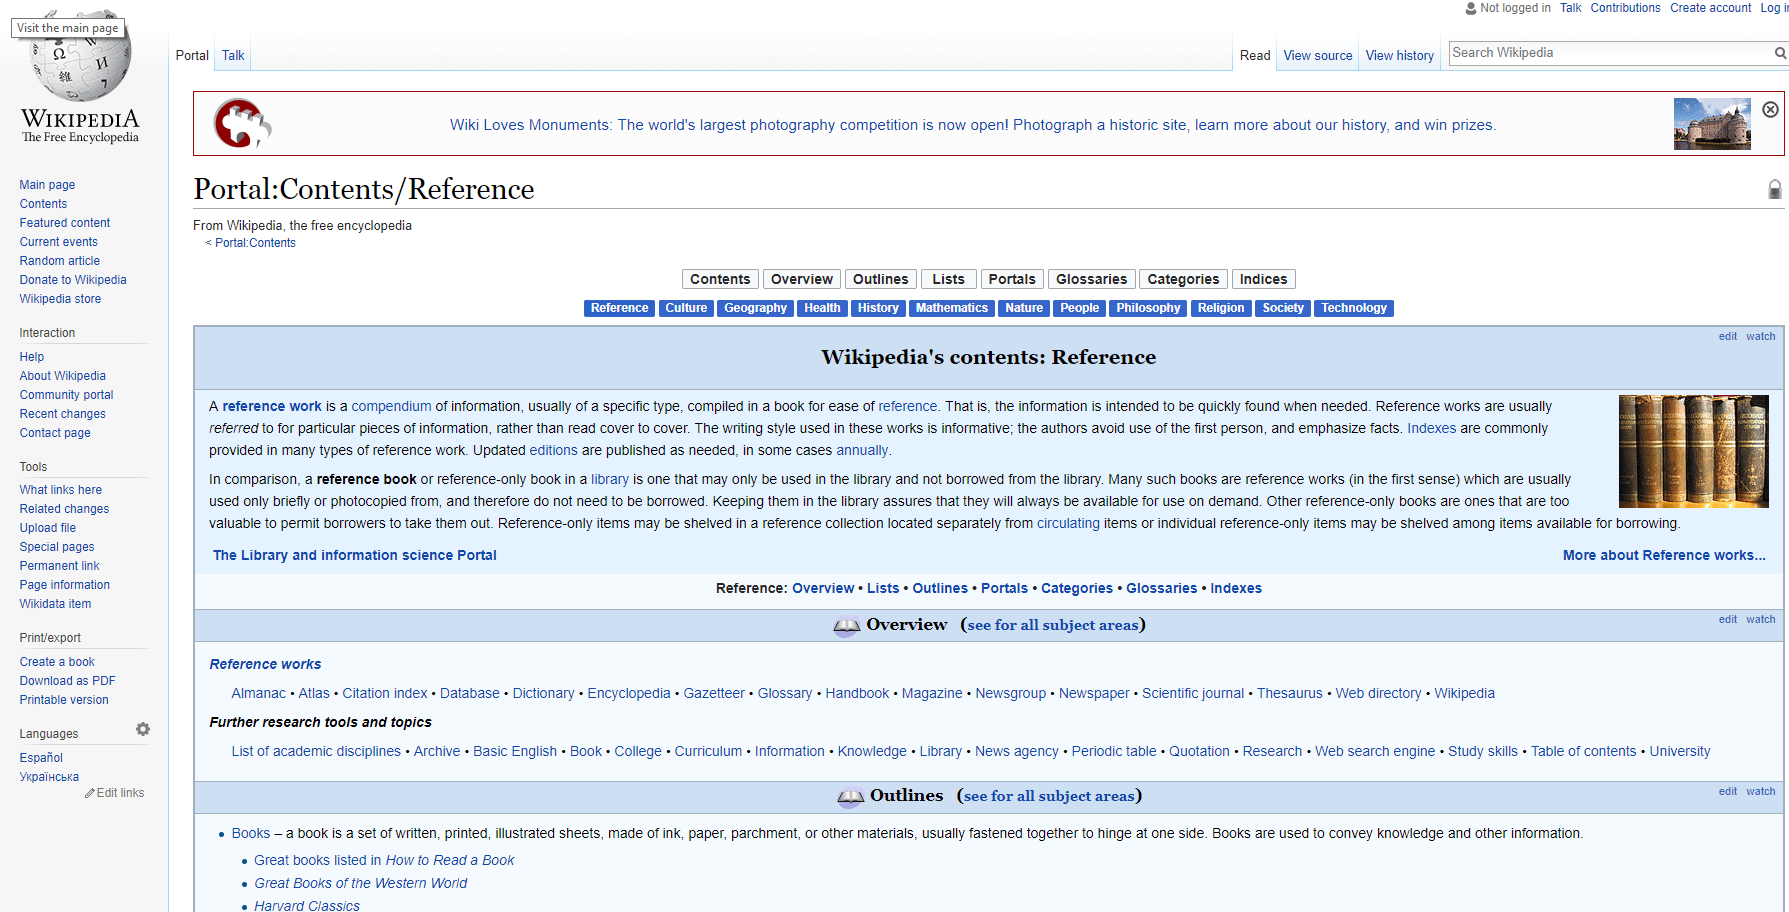 First, click on the selector we just made in the selector screen. Note that we are now in the “/root/button click” segment of the sitemap. This means that whatever selectors we place here will only be triggered on the results of the “button click” selector. These results should be all of the sub pages of the Wikipedia portals page. So to find create and hone our next selector, direct your browser to one of the sub pages through the top menu. I’ll click on culture. From here we can see the initial content section similar to all of these sub pages, as well as the image we will try to scrape on the right. One technique for improving the predictability of this (and all) scrapers, is to first select an HTML element surrounding what we would like to select and then to traverse from that parent element to the element we would like. While at times you may want to select an element that is wholly distinct on a page and thus doesn’t need traversing, oftentimes, the structured honing in on an element through traversal helps keep results predictable.
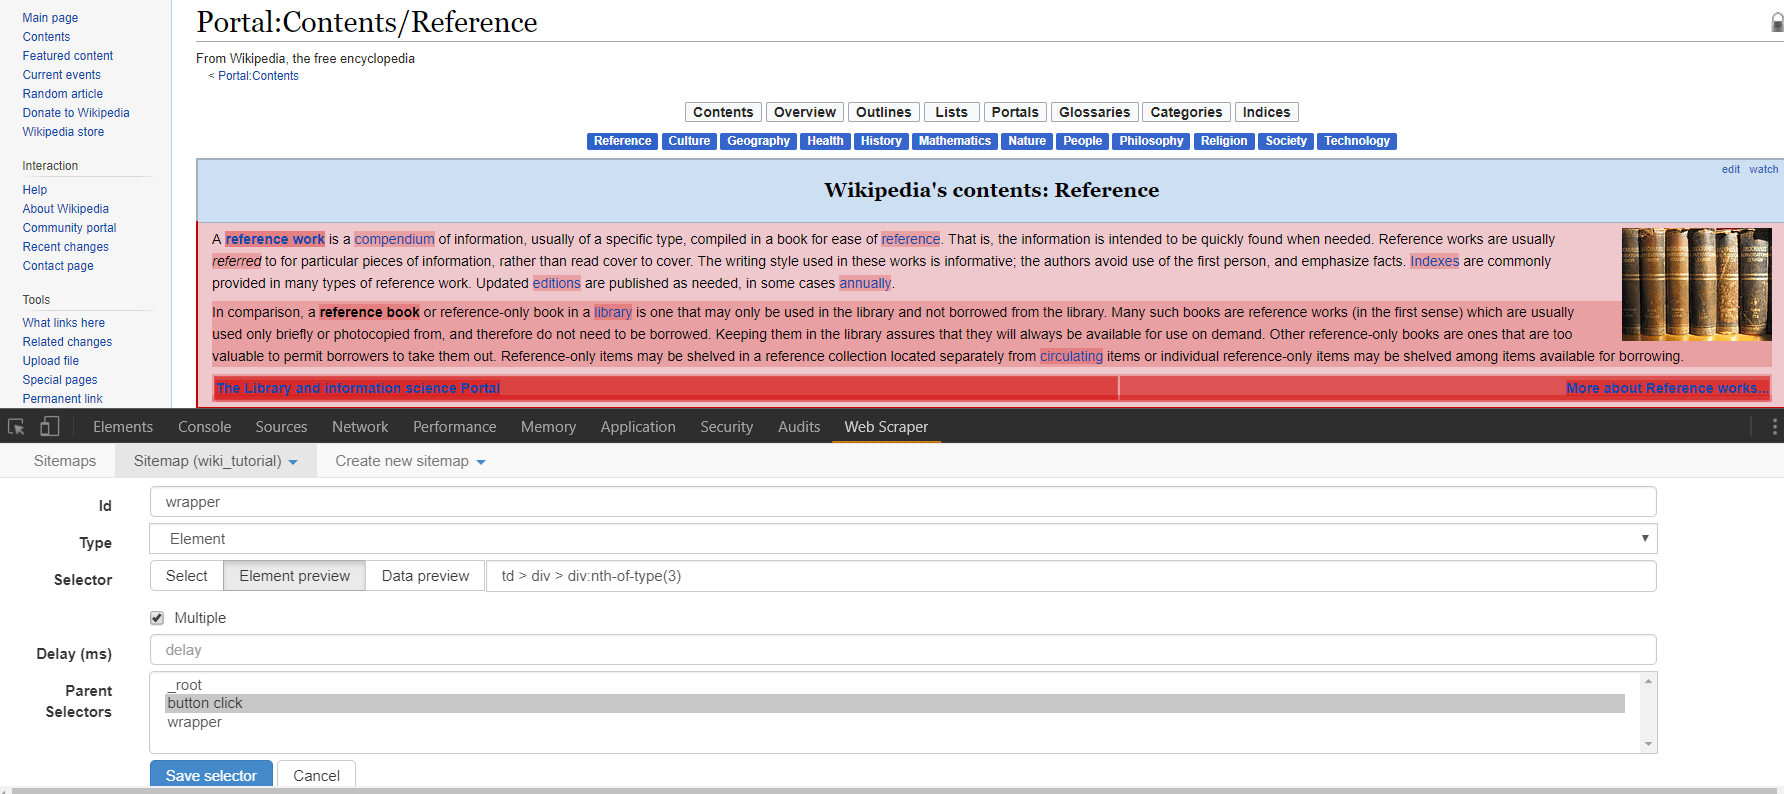 In this case, let’s create a new selector. I’ll name mine “wrapper” and give it a type of element. Element types for Web Scraper are used to grab any generic section of html that contains elements of varying parts. The child selectors that are passed what is scraped from this element selector will only take information from that element. After toggling “element preview” and clicking “select” you can hover over and click the entire content box on the page we’re looking at. The ensuing selector should read “td > div > div:nth-of-type(3)”. Note that we do not have to toggle multiple as this selector will be separately called on every new page that is opened, and we are just trying to select one “wrapper” element from each page.
 After clicking “save selector” we can click on our “wrapper” selector to dig down another level in the sitemap we’re creating. Click to create a new selector that we’ll use to grab the image on the right side of the screen. In this case i’ll title my selector “image” and select the type of image. After toggling “element preview” and “select” you can click on the image in the right side of the content block. Note that the ensuing path to the img is simply “img” as there are no other images within our parent selector that we need to differentiate from. Note on there are options for downloading the image we’ve selected, but for our purposes let’s just scrape the html img element. Once you’ve saved this selector, you can toggle the drop down menu for “sitemap” and click “scrape”.
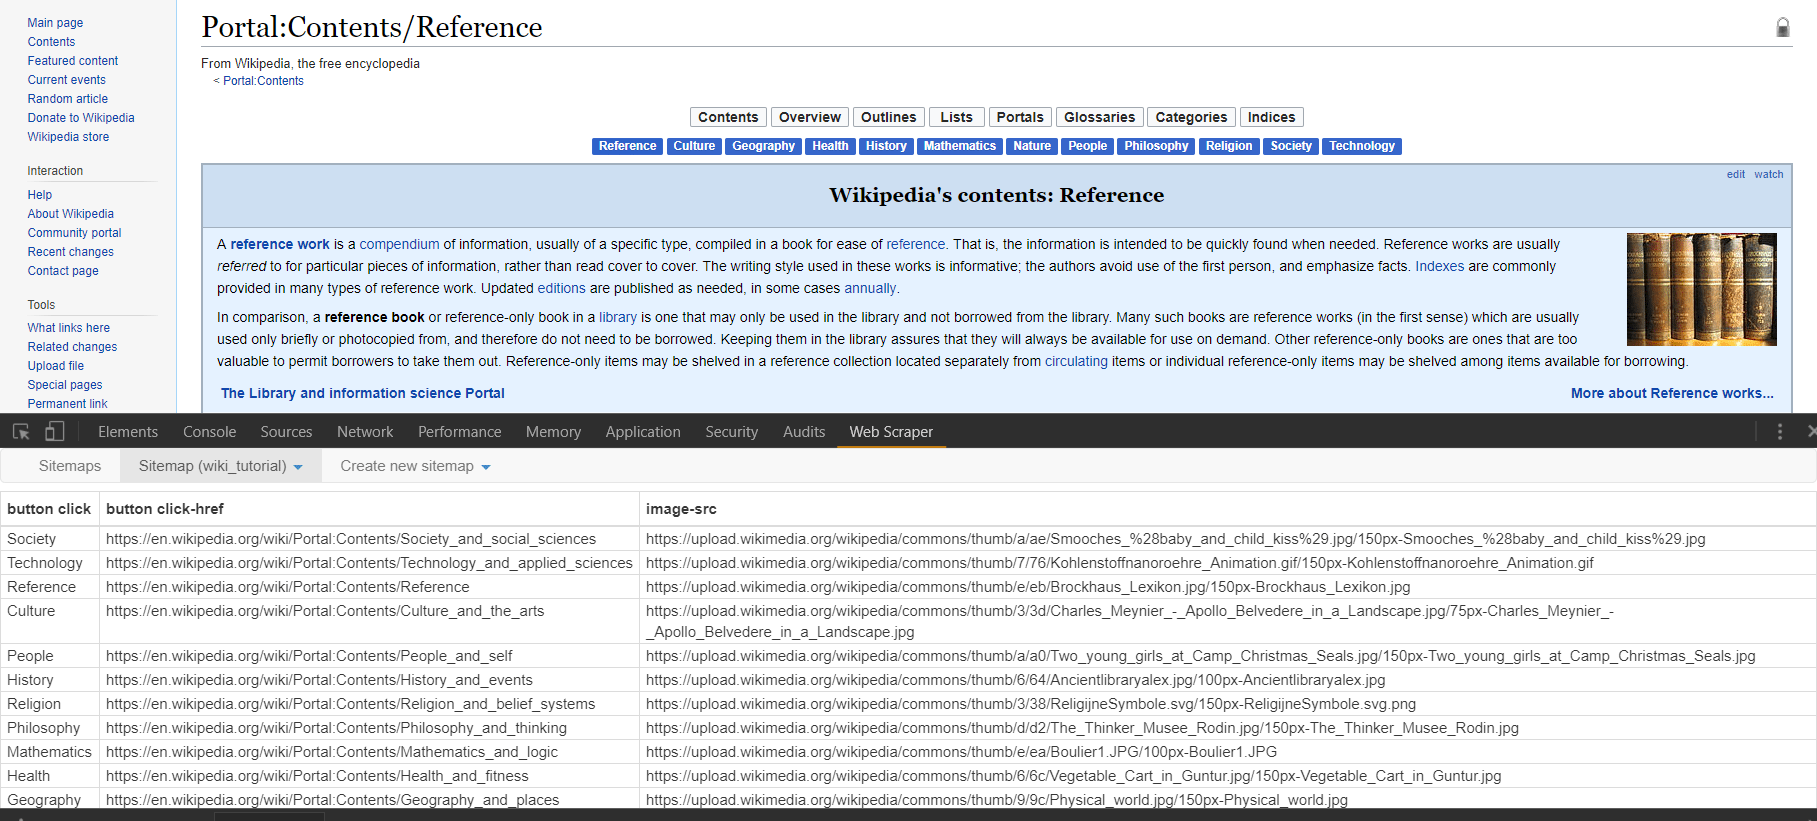 The scraping for this project should just take a matter of seconds and you should see a popup opening all of the links from the menu clicks. Once the scrape is done, you will be redirected to a table in the web-scraper dashboard that contains the pages the scraper has clicked through as well as the url for the images we sought on each page. You can download this information into a csv, or copy and paste.
Note there are many other features of this scraper. A detailed documentation as well as several videos on different use cases may be found on the home page of the scraper under “learn.” Some final tips that might prove helpful include the ability to grab an unlimited number of elements at any stage of the sitemap. In our last example, we could have grabbed every separate paragraph element, every link, followed every link, obtained the raw html for a section (good for finding hidden email addresses) and downloaded the image. For how accessible this scraper is even to those with limited HTML, CSS, and Regular Expressions knowledge, this is our highest recommended scraper for a wide range of projects. Enjoy!
The scraping for this project should just take a matter of seconds and you should see a popup opening all of the links from the menu clicks. Once the scrape is done, you will be redirected to a table in the web-scraper dashboard that contains the pages the scraper has clicked through as well as the url for the images we sought on each page. You can download this information into a csv, or copy and paste.
Note there are many other features of this scraper. A detailed documentation as well as several videos on different use cases may be found on the home page of the scraper under “learn.” Some final tips that might prove helpful include the ability to grab an unlimited number of elements at any stage of the sitemap. In our last example, we could have grabbed every separate paragraph element, every link, followed every link, obtained the raw html for a section (good for finding hidden email addresses) and downloaded the image. For how accessible this scraper is even to those with limited HTML, CSS, and Regular Expressions knowledge, this is our highest recommended scraper for a wide range of projects. Enjoy!
 Once you have scrape box installed and have opened the program, note the four main boxes. Starting from the upper left and moving counterclockwise those boxes include the following: keywords you would like to scrape search engine results for, the URLs you would like to scrape (often from the results of the keywords section to the left), the comment poster, and finally in the bottom left the search engine and proxy settings. In this tutorial, we’ll walk you quickly through three common scraping practices with Scrape Box. Then we’ll turn you over to your own devices with a few resources. Scrape Box has a ton of features, and you can even develop more of your own. So while this is only scratching the surface of Scrape Box, it’s easily the most powerful of the three scraping tools we’ve mentioned in our write up.
Adding Keywords and a Footprint
Once you have scrape box installed and have opened the program, note the four main boxes. Starting from the upper left and moving counterclockwise those boxes include the following: keywords you would like to scrape search engine results for, the URLs you would like to scrape (often from the results of the keywords section to the left), the comment poster, and finally in the bottom left the search engine and proxy settings. In this tutorial, we’ll walk you quickly through three common scraping practices with Scrape Box. Then we’ll turn you over to your own devices with a few resources. Scrape Box has a ton of features, and you can even develop more of your own. So while this is only scratching the surface of Scrape Box, it’s easily the most powerful of the three scraping tools we’ve mentioned in our write up.
Adding Keywords and a Footprint
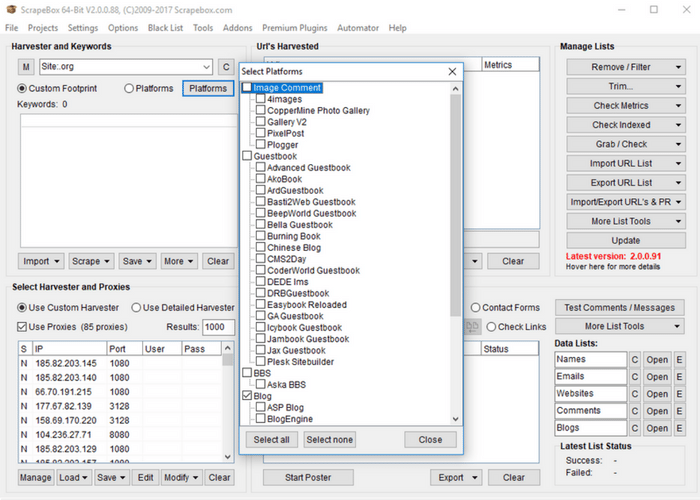 For the first step, let’s look at the keywords box. Unless you already have a list of URLs that you know you want data from, this is often where you you’ll get the URLs you would like to scrape. It is also a great tool for competitor analysis or finding new potential leads. So if you’re using Scrape Box, you should probably at least try out the keyword features (they’re awesome). Notice that in the keyword section there are two input boxes. The first that doesn’t have labels on either side of it is your “footprint.” Your footprint is something that you would like to appear on every site that shows up as a result. This is used if you would like to only return .gov sites, or WordPress sites, or sites with an address within a certain city. Note that the “Platforms” button opens a list of common platforms that you can use for your footprint. If you only want sites that are WordPress with a certain type of comment box, select them. For our purposes we’ll look at sites that end in .org. Enter “Site:.org” into the footprint bar. The Site: prefix is one of a few common prefixes for the footprint bar. They include:
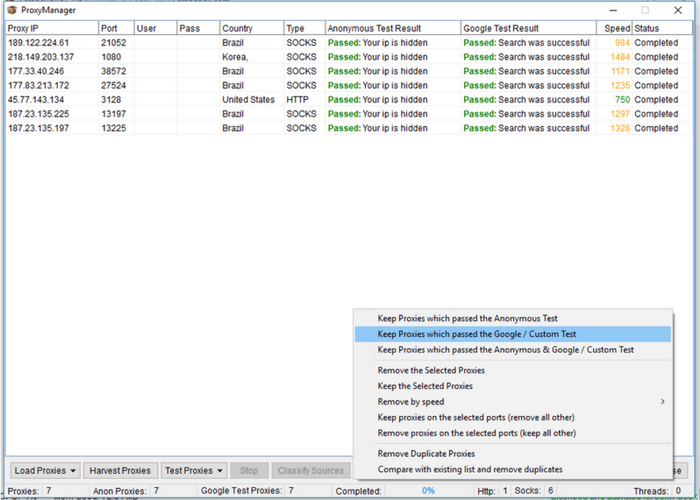
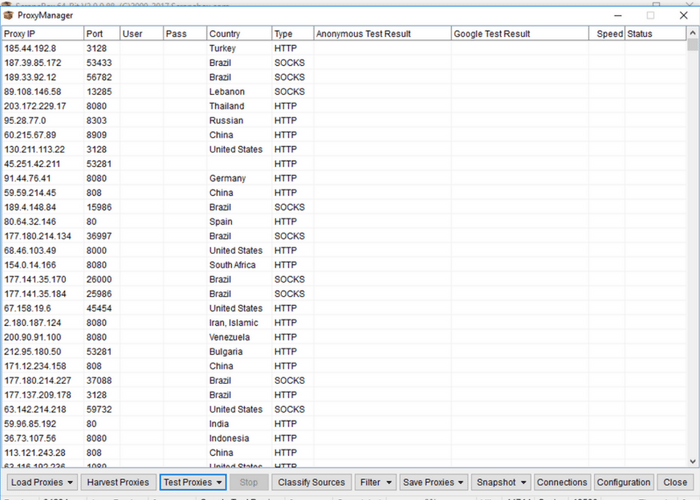 Start by clicking “Manage” in the bottom left corner of the proxy box. In the window that opens click “Harvest Proxies.” This will open a new window where you should toggle all available sources of public proxies. Click “Start” and Scrape Box will start gathering proxies. This may take a while, but you don’t need every available proxy. Waiting for about thirty seconds as it gathers proxies is generally enough to gather thousands. Hit “Apply” and these proxies will be added to your proxy list. You’ll want to test the proxies before using them, so toggle the drop down menu under “Test Proxies” and select “Test All Proxies.” This may take a while, but if you’re doing a smaller scrape on Google you really only need 10-20 proxies to begin with. Wait until the “Google Test Proxies” notification in the bottom of the window reads somewhere between 10 and 20 then click “Stop.” If you’ll notice the “speed” column, this is registering how many milliseconds it takes individual proxies to respond. Many of them are often quite slow, and using proxies that are too slow will tend to lead to to timeout errors when scraping. So under the “filter” drop down menu you can proceed to “remove by speed” and remove slow speed proxies. This will probably lower your total number of proxies some, but as long as you’re in the range of working proxies we discussed earlier you should be good to go. If you’re planning on scraping Google results, toggle the “filter” and select “Keep Google Proxies.” For other search engines you can “Keep Anonymous Proxies” which will yield a higher number of remaining proxies. In my Scrape Box this had led to a total of 7 remaining proxies, which is an amount that would work for a small scrape. Toggle “Save Proxies” and then “Save Proxies to Proxy List” and you’re good to go! Close the popup window to return to the main screen for Scrape Box.
 Generating URLs to Scrape
Next we can use our keywords and footprint to generate a list of URLs to scrape. After the last two steps, this step is simple. First, enter the number of results you would like to scrape under “selected harvester and proxies.” For the sake of this tutorial we’re just going to scrape 10 results. Generally a useful scrape would contain a great deal more. It’s of note that for small groups of keywords, however, often just the first few hundred results are useful or of a notable page rank.
Generating URLs to Scrape
Next we can use our keywords and footprint to generate a list of URLs to scrape. After the last two steps, this step is simple. First, enter the number of results you would like to scrape under “selected harvester and proxies.” For the sake of this tutorial we’re just going to scrape 10 results. Generally a useful scrape would contain a great deal more. It’s of note that for small groups of keywords, however, often just the first few hundred results are useful or of a notable page rank.
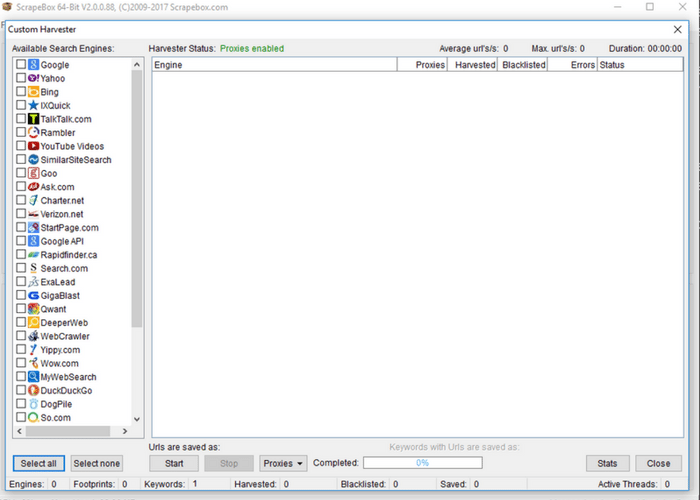 Next head over to the “Url’s Harvested” section of Scrape Box and click “scrape.” This will open a prompt that allows you to choose which search engine(s) you would like to scrape from. Select those that apply and hit “scrape.” If you kept your number of scraped results low, the results should be in almost instantaneously. If you close the results page as well as the “scrape” page and head back to the main page, you can see the newly harvested URLs in the “URL’s Harvested” pane. Next, some choices about what to do with those URLs!
How to Utilize URL Data
Once you have a list of URLs that (presumably) have information you’re seeking to scrape, you have a number of options on how to proceed with Scrape Box. On the right-hand navigation menu the “grab/check” drop-down menu holds a number of common scrapers including the ability to grab emails, to grab phone numbers, to grab META data from sites, and to grab inbound and outbound links. Scrape Box also has a number of free and paid add-ons, which can be accessed by clicking “Add-ons” then “Show Available Add-ons” in the top bar of the program. These will enhance the number of pre-built scrapers at your disposal.
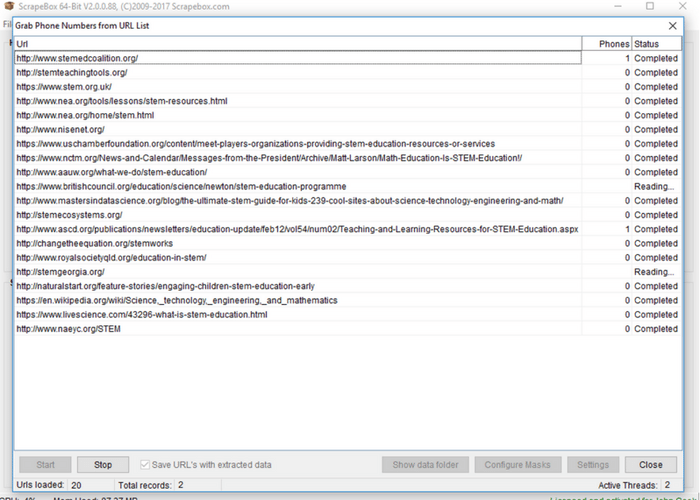
We’ll show the simple process of gathering exposed phone numbers in this tutorial. First toggle the “grab/check” drop-down menu then select “grab phone numbers from harvested URL list.” Once a new window opens, toggle “save URLs with extracted data.” Unless you are sure that every page will result in data that can be extracted this allows you to match up the extracted data with the domains it comes from. Then click “start.” Our short list of URLs yielded two results once it is completed. To see your results click “show data folder” which will direct you to where information from all similar scrapes is held organized by time. If you open one of the resulting files, it should hold a list of URLs paired with harvested phone numbers.
Next head over to the “Url’s Harvested” section of Scrape Box and click “scrape.” This will open a prompt that allows you to choose which search engine(s) you would like to scrape from. Select those that apply and hit “scrape.” If you kept your number of scraped results low, the results should be in almost instantaneously. If you close the results page as well as the “scrape” page and head back to the main page, you can see the newly harvested URLs in the “URL’s Harvested” pane. Next, some choices about what to do with those URLs!
How to Utilize URL Data
Once you have a list of URLs that (presumably) have information you’re seeking to scrape, you have a number of options on how to proceed with Scrape Box. On the right-hand navigation menu the “grab/check” drop-down menu holds a number of common scrapers including the ability to grab emails, to grab phone numbers, to grab META data from sites, and to grab inbound and outbound links. Scrape Box also has a number of free and paid add-ons, which can be accessed by clicking “Add-ons” then “Show Available Add-ons” in the top bar of the program. These will enhance the number of pre-built scrapers at your disposal.
We’ll show the simple process of gathering exposed phone numbers in this tutorial. First toggle the “grab/check” drop-down menu then select “grab phone numbers from harvested URL list.” Once a new window opens, toggle “save URLs with extracted data.” Unless you are sure that every page will result in data that can be extracted this allows you to match up the extracted data with the domains it comes from. Then click “start.” Our short list of URLs yielded two results once it is completed. To see your results click “show data folder” which will direct you to where information from all similar scrapes is held organized by time. If you open one of the resulting files, it should hold a list of URLs paired with harvested phone numbers.
 For many purposes, the pre-built scrapers in Scrape Box are fantastic, though the email and phone scrapers only find exposed data of that type, which does not regularly occur. For elements that are publicly available, like inbound and outbound links, META data, article titles and such, the pre-built scrapers are very effective.
If you’re seeking a data type that is harder to come by or hidden to site though included in the rendered HTML, a custom scraper is often the next best solution. Head back to the home screen for Scrape Box and toggle the “grab/check” drop-down menu. Proceed to “custom data grabber” and then “create or edit a custom grabber.” Before we begin, this section of Scrape Box is fully utilized with some knowledge or the ability to figure out Regular Expressions. A cheat sheet on common regular expressions may be found at Rex Egg’s Regex Cheat Sheet.
For many purposes, the pre-built scrapers in Scrape Box are fantastic, though the email and phone scrapers only find exposed data of that type, which does not regularly occur. For elements that are publicly available, like inbound and outbound links, META data, article titles and such, the pre-built scrapers are very effective.
If you’re seeking a data type that is harder to come by or hidden to site though included in the rendered HTML, a custom scraper is often the next best solution. Head back to the home screen for Scrape Box and toggle the “grab/check” drop-down menu. Proceed to “custom data grabber” and then “create or edit a custom grabber.” Before we begin, this section of Scrape Box is fully utilized with some knowledge or the ability to figure out Regular Expressions. A cheat sheet on common regular expressions may be found at Rex Egg’s Regex Cheat Sheet.
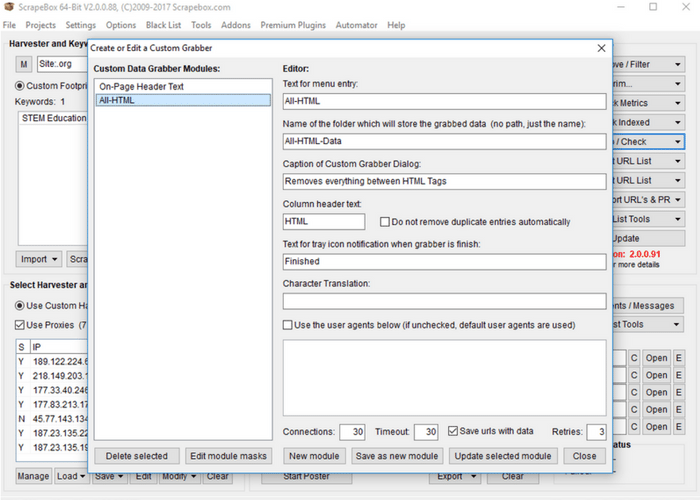 For simplicity’s sake i’ll show you how to make one of the most general grabbers, a grabber for all HTML on the page that you can then parse through using whatever methods you wish. To begin creating a custom grabber, start by giving the grabber a name for the menu. I’ll title mine “All-HTML.” What I entered for other required inputs may be seen in the image above. Note that again I checked “save URLs with data” for the purposes of eventually moving the scraped information into a spreadsheet. Next hit “save as a new module.”
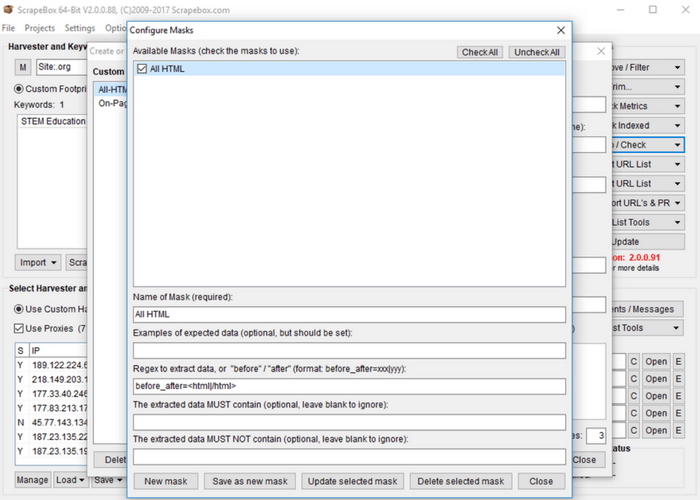 You will see your new module added to the list in the left. Select your new module by clicking on it. Then click “edit module masks.” Masks are what specify what we will be grabbing from the page. Click “New Mask” and fill give your mask a name (I called mine “All HTML”). We next specify using Regex or “Before_After” format our selectors for data. “Before_After” format is quite easy to figure out with basic HTML knowledge, so i’ll give an example of this sort of selector. In the above example i’ve specific the HTML element I want before what is scraped, and the HTML element I want after what is scraped. In this case we want everything between HTML tags. As some HTML files have specific endings to antag, I’ve only included the start of the tag (“<html”). For the after parameter I’ve just included “/html>.” Next click “save as a new mask” then “save as a new module” on the ensuing screen.
Back on the Scrape Box main page we can now toggle the drop down at “grab/check” and proceed to “custom data grabber.” In this expanded menu we should see our “All-HTML” module (or whatever you named your module). If you click the name of your module a pop-up similar to the phone scraper should appear. Click “Start” and your new custom scraper should begin. As our example scraper was so general, every page resulted in a single entry (basically the HTML of the entire page). Once you have all HTML of pages, there are a variety of ways you can parse the data. By searching with regular expressions in your favorite text editor you can tailor your search to certain tag types, or characters. If you’re trying to scrape all pages of a single domain, you can start by utilizing the “link extractor” (free) add-on for Scrape Box, or by simply adding a keyword in the format of “site:www.yoursite.com” and re-scraping your URL list.
We hope you’ve enjoyed our tutorial, and that it was enough to get you started on your path towards contact information and intelligence gathering superiority! Find more resources on our website including up-to-date rankings on academic programs and certificates for marketing and intelligence degrees.
You will see your new module added to the list in the left. Select your new module by clicking on it. Then click “edit module masks.” Masks are what specify what we will be grabbing from the page. Click “New Mask” and fill give your mask a name (I called mine “All HTML”). We next specify using Regex or “Before_After” format our selectors for data. “Before_After” format is quite easy to figure out with basic HTML knowledge, so i’ll give an example of this sort of selector. In the above example i’ve specific the HTML element I want before what is scraped, and the HTML element I want after what is scraped. In this case we want everything between HTML tags. As some HTML files have specific endings to antag, I’ve only included the start of the tag (“<html”). For the after parameter I’ve just included “/html>.” Next click “save as a new mask” then “save as a new module” on the ensuing screen.
Back on the Scrape Box main page we can now toggle the drop down at “grab/check” and proceed to “custom data grabber.” In this expanded menu we should see our “All-HTML” module (or whatever you named your module). If you click the name of your module a pop-up similar to the phone scraper should appear. Click “Start” and your new custom scraper should begin. As our example scraper was so general, every page resulted in a single entry (basically the HTML of the entire page). Once you have all HTML of pages, there are a variety of ways you can parse the data. By searching with regular expressions in your favorite text editor you can tailor your search to certain tag types, or characters. If you’re trying to scrape all pages of a single domain, you can start by utilizing the “link extractor” (free) add-on for Scrape Box, or by simply adding a keyword in the format of “site:www.yoursite.com” and re-scraping your URL list.
We hope you’ve enjoyed our tutorial, and that it was enough to get you started on your path towards contact information and intelligence gathering superiority! Find more resources on our website including up-to-date rankings on academic programs and certificates for marketing and intelligence degrees.
Tool 1: Scraper Extension offered by dvhtn
This Chrome plugin (also usable on Firefox, Vivaldi, and Opera) known simply as “Scraper” affords those with a complete lack of developer skills to grab a wide range of web page elements and quickly copy them to a clipboard. Intermediate and advanced users who know some XPath or jQuery will be capable of extending the range of items that Scraper can grab. First, navigate over to the Chrome Web Store and hit the “add to chrome” button. This step is the same for installing the extension on Chrome, Vivaldi, and Firefox. Unlike a number of other extensions, there’s no icon in the task bar for this extension. Rather you’ll notice that a new option has been added to your menu when you right click on a web page noting “scrape similar.”
FEATURED ONLINE PROGRAMS
-
>Master’s in Marketing Communications
The Marketing Communication master’s concentration prompts you to analyze consumer behavior, conduct market research, and engage the power of brands and messages in order to develop powerful digital marketing strategies. Evaluate various tactics, measure their effectiveness, and explore the intricacies of working with or in complex, multi-functional teams to execute compelling marketing campaigns. Highlights:
- Top 100 university
- 100% online
- No GRE

SPONSORED
For simplicity’s sake (and so as not to overload any one site’s point of contact) we’re going to look at scraping the Wikipedia page that is a list of sovereign states. This page has a large table of nation states from the around the world, with related information such as notes on if their sovereignty is disputed, if they are a member of the United Nations, and additional points of interest. If you start with a right click on the name of the first nation with a flag next to it — in my case that’s Afghanistan — you’ll notice the newly added option to “scrape similar.” After clicking “scrape similar” you should note a new popup window with a small spreadsheet inside of it. If the nation you clicked you “scraped similar” from was a link you should receive two columns and 206 rows: the name of the nation and a relative URL to the wikipedia entry on that nation.
For the most un-tailored scrapes that this scraper can achieve, that’s all there is to it. You can click the “copy to clipboard” button and continue in a spreadsheet with your newly scraped information. Without further tailoring your selection, many scrapes will work as you would have them with this extension. Many, however, will not. In what follows we will detail ways in which a total beginner or someone with a very basic knowledge of HTML can get most of what this scraper has to offer.
Once you’ve scraped this entry and the corresponding popup has emerged, note that the top left hand corner of the popup contains a section on the “selector” used to scrape the information we’ve selected. This may look foreign unless you have know XPath or have some HTML knowledge. But let me just step you through what is going on here as it should help to inform users without knowledge of those things why this scraper may sometimes work in ways they aren’t expecting.
The values in the “selector” box include “//td/b/a” which is an XPath query, and otherwise recognizable as three HTML elements. The text we originally selected was inside of a table, which in html is constructed using <td> elements (or table data), every “box” in the table is surrounded by <td></td> html tags, and so an initial XPath query of “//td” would return the values in every one of the boxes of the table. You can try this out by simply editing the “selector” box to hold “//td.”
In our initial scrape, however, note that we only received values for the first column in the table, as well as the the URLs of those nation entries. XPath works by traversing from a general query to a more specific query. Every ensuing page element after a slash will prompt the scraper to look for whatever that second element is from among the data gathered from the first element. The third element will search for data matching it’s type from within the second, and so forth. In this case the scraper located every element in a cell in the table (“//td”) and then looked for every one of those elements that was bolded (“<b></b>” in HTML). Quickly scrolling through the table one can see that only the first column of the table is visibly bolded. Thus the XPath query of “//td/b” actually returns what we were seeking. The additional element in the query (“/a”) refers to the HTML element for an anchor, or a link. In HTML this element looks like <a href=”YourLink.com”>Link Text</a>. In some ways this scraper is smart. Or at least opinionated, in that it decided to automatically query the element that contains all that we could possible want from right clicking on an entry that is a bolded link in the first column. Links are one of the few elements this scraper will automatically pull out if you originally right click and “scrape similar” from a link. Note that some email addresses are hidden in links in the form of
<a href=”mailto:youremailaddress”>Email Me</a>. So if the first column of the table we’ve scraped thus far contained links meant to open an email window, we would receive the text of the link along with “mailto:youremailadress.” With a little spreadsheet knowledge it’s easy to remove “mailto:” and you’ve got your addresses.
For those with knowledge of HTML some basic syntax of XPath should be enough to carry you through to utilize most of the usefulness of this scraper. Here are two of the best cheat sheets on XPath we’ve found. Note that all queries start with a double forward slash, and may be used with only elements familiar to HTML or with a wide array of functions and regular expression-like syntax.
One further tip, that most users with some familiarity on how sites are structured probably know involves the use of developer tools. Developer tools are available in all modern browsers, and certainly available in all of the browsers that this web scraper works for. If your initial scrape does not work as expected due to the “selector” not latching on to what you think it should, your next best bet is to right click and “inspect element.” This open developer tools (also known as Firebug in Firefox) which provides an interactive view of the rendered HTML where you right clicked. Upon moving your mouse around the HTML elements in dev tools, portions of the page will become highlighted, giving you a view of what selectors may work to provide a selector that works for this scraper. As seen in the picture above, right clicking on the html element you would like to scrape as it is represented in developer tools provides the option to “copy selector.” If you’re familiar with jQuery and would rather use jQuery style selectors, simply toggle the drop down menu next to selector in the scraper popup window.
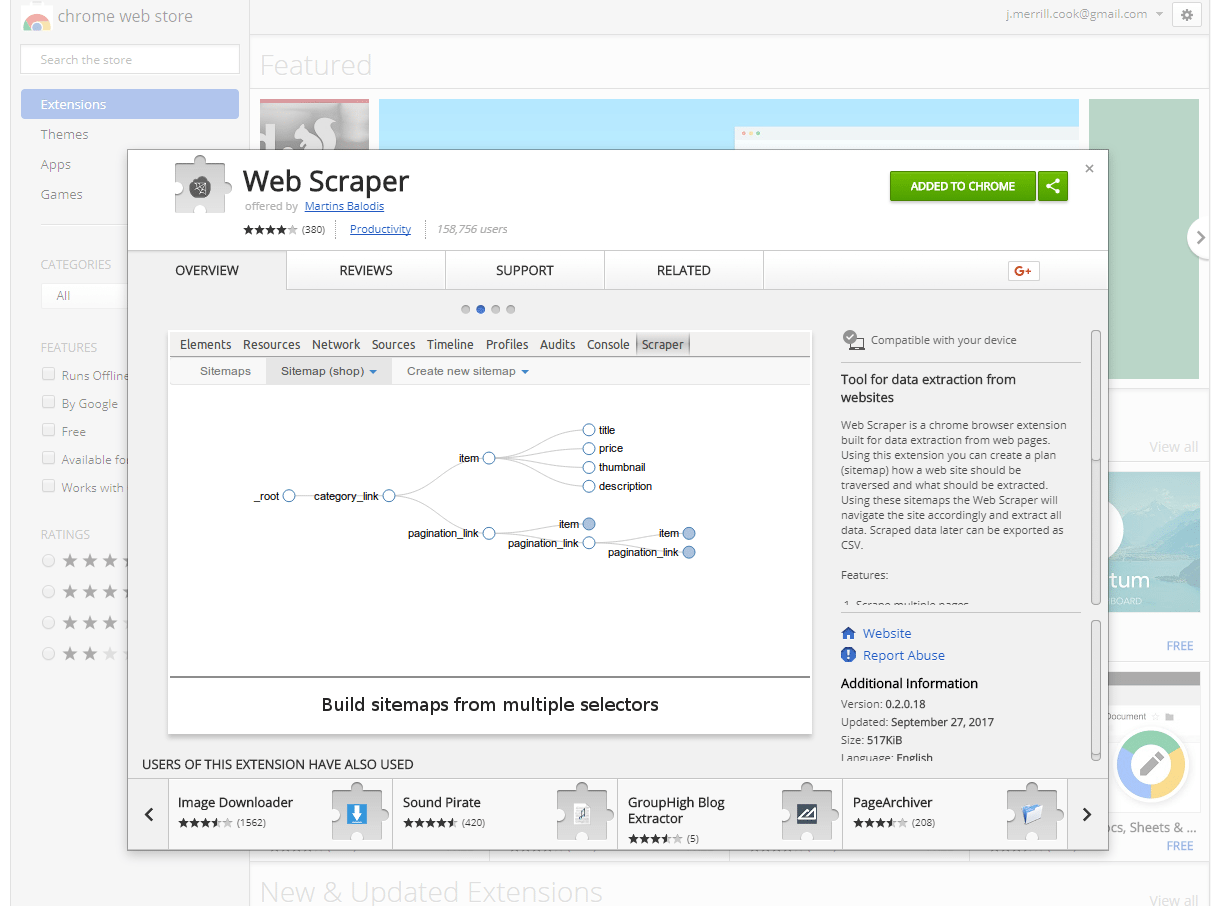
Tool 2: Web Scraper by Martins Balodis
Our second scraper bridges the gap between a (mostly) one-click scraper like the previous scraper and a more fully-functional scraper. Features included in this scraper include the ability to create a model of a sitemap that the scraper can traverse. This allows this scraper to click on elements and follow links, or trigger elements that may only show after a brief transition. Examples of scraping scenarios that this scraper can tackle that the previous scraper cannot include obtaining information from multiple paginated pages, or clicking every category on a page and scraping elements from each resulting page.
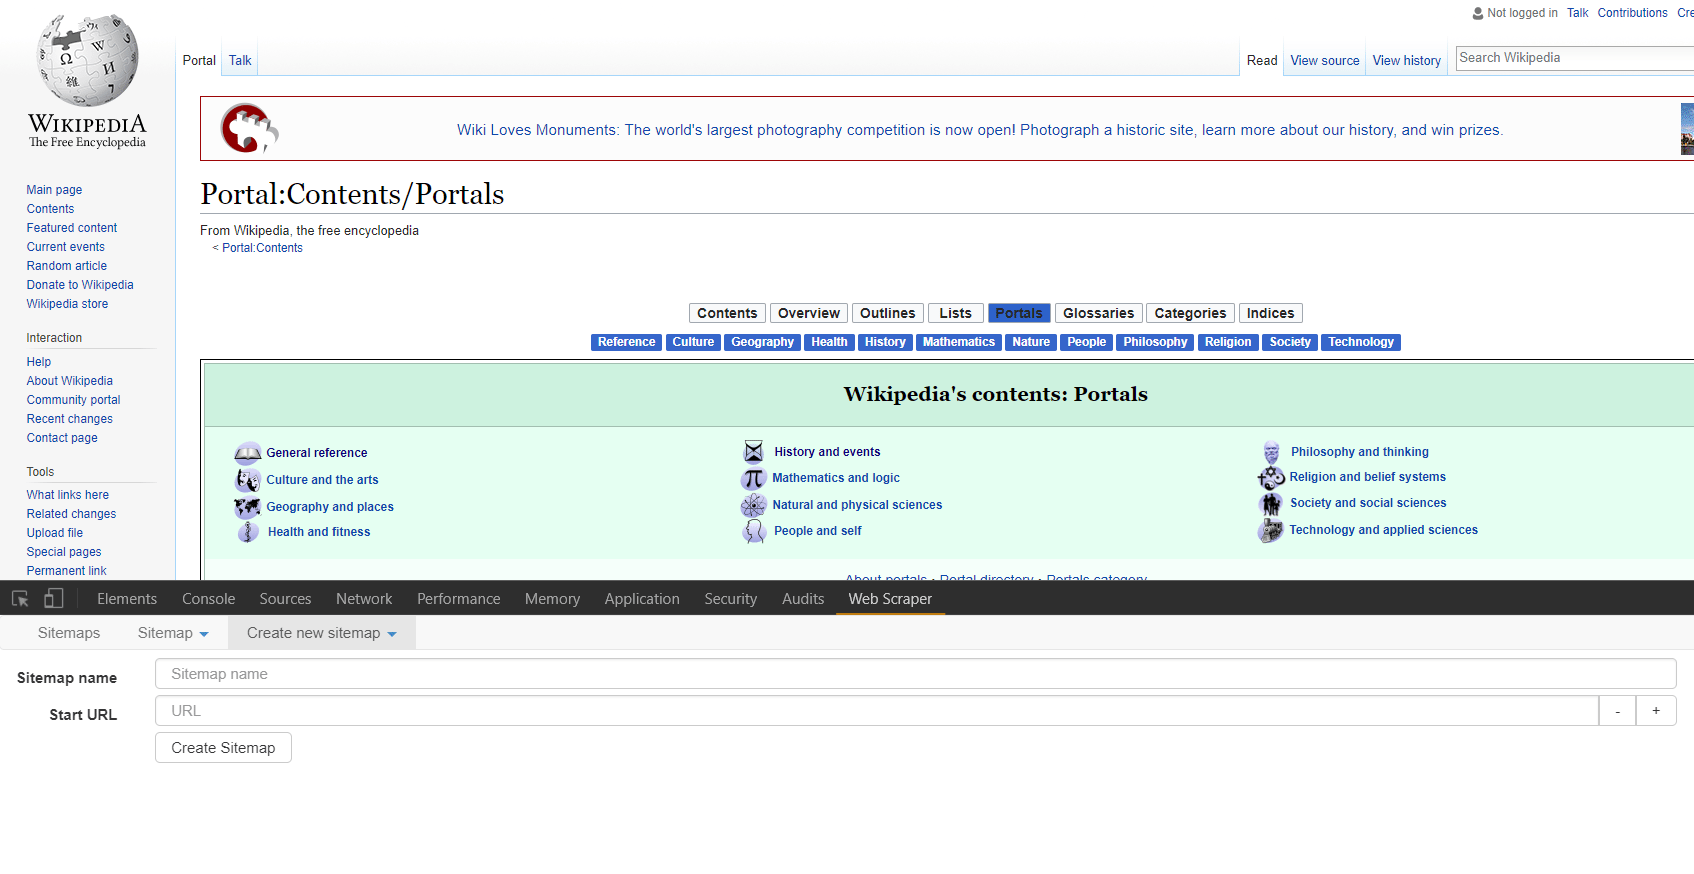
This scraper is also an extension, though only works on the Chrome Browser. Navigate to the extension’s homepage in the Chrome Web Store to integrate the extension with your browser. Once the extension is activated, proceed to the hub for portals on Wikipedia, where we will step through an example of using this scraper together. This scraper is located in the developer tools section of Chrome, so first right click on the page we’re scraping and select “inspect.” Alternatively, one can click ctrl+shift+i if on Windows.
If you’ve spent any time in developer tools you might notice that a new tab has been added titled “Web Scraper.” Click this tab to begin. The first step to using the Web Scraper is establishing a sitemap. Toggle the drop down menu from the “New Sitemap” tab and select “Create Sitemap.” Name your sitemap something recognizable in the event that you might want to utilize the site map again. Also, if you download elements locally such as images you’re scraping, the elements will be stored in a sub-directory of your downloads folder named after the sitemap. Then enter the URL where you would like to begin your scrape in the “Start URL” field. Click “Create Sitemap” and we’re ready to go.
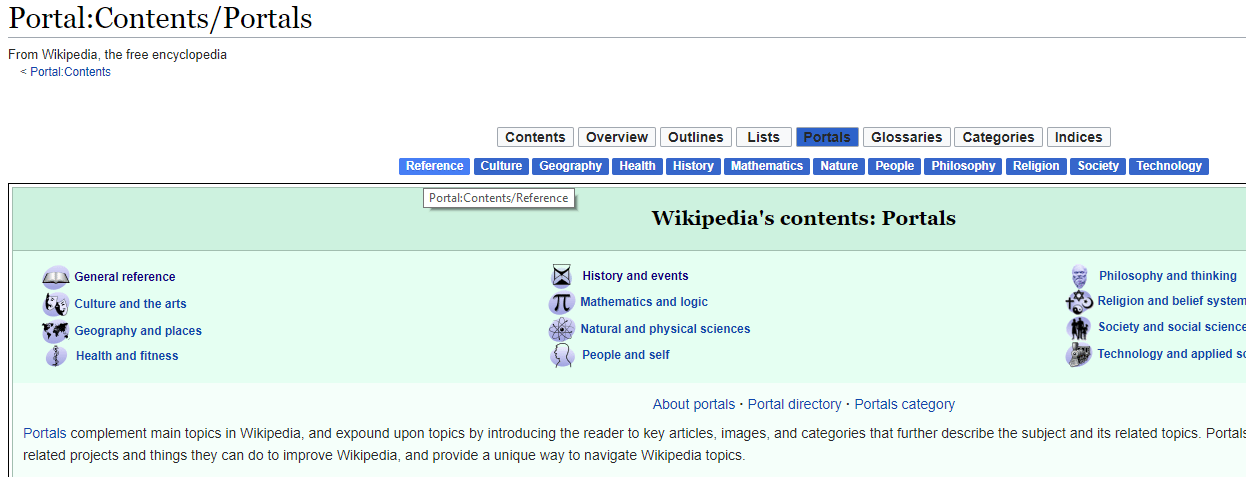
Next we’re going to have to ascertain what we are trying to scrape. Presently there is a row of blue buttons relating to general portal topics close to the top center of the page. If you click through a few you will note that they are links to separate pages, and the resulting pages all follow the same general styling and format. This choice is arbitrary, yet you can probably imagine a fundamentally similar organizational scheme for scraping prices or details about products from an e-commerce site, or scraping email contacts from a directory of workers.
In the “Sitemap” drop down menu click on “selectors” (familiar from the last scraper, right?). You should see the header for a table with an “add selector” button. Note that we are at the “/root” of the scraper, and click “add selector.” The “/root” here means that we are starting from the most general node of the rendered HTML on the page you established as the “Start URL.” For this example, let’s make a scraper that clicks through all of the category links in the top-center of the page, and grabs the location of the first image in the description text.
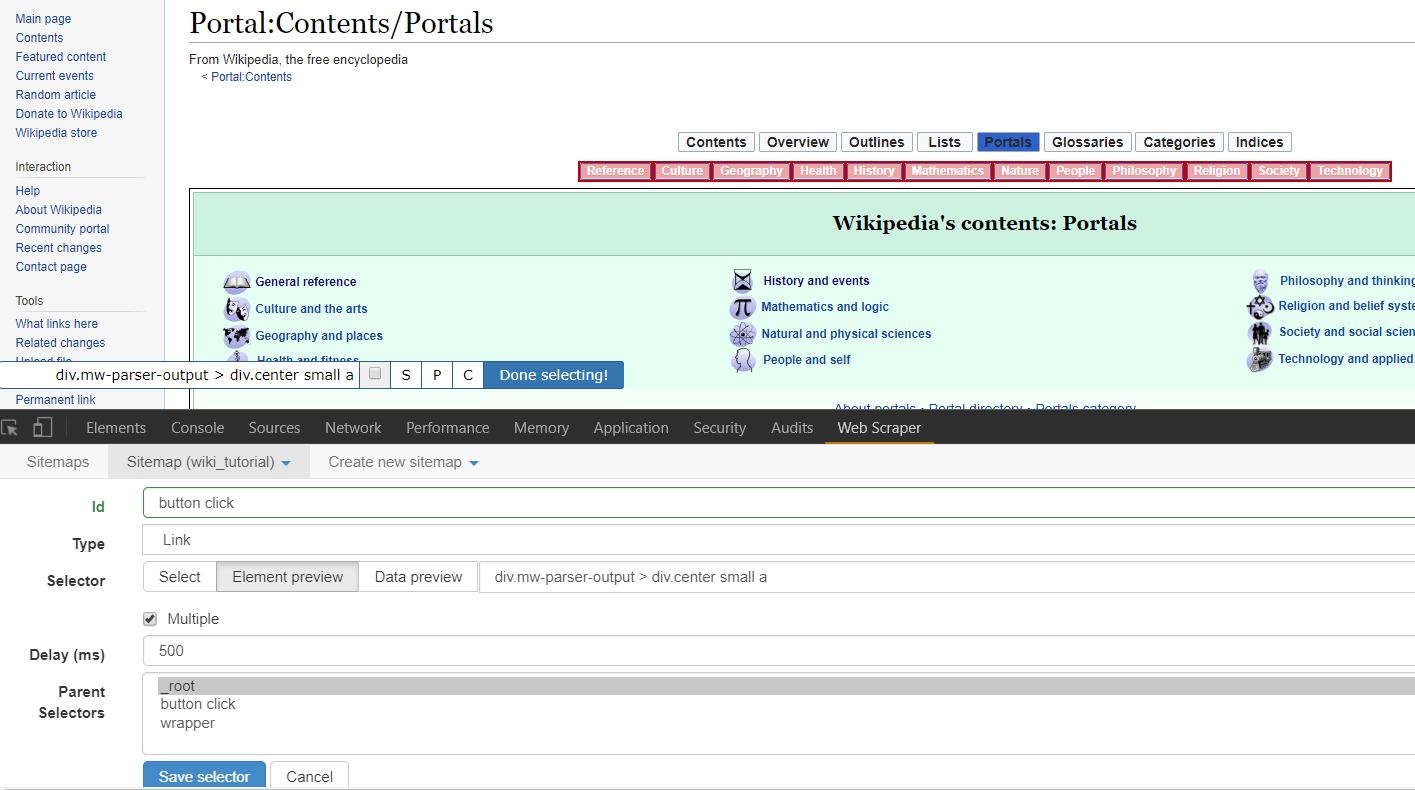
To add our first selector, we’ll name it “button click” and we’ll toggle the “type” to “link.” Notice that there is also an “element click” option, which is similar though more tailored to clickable elements that change the page layout but keep you on the same page in the end. To fill out the remainder of the form, toggle “multiple” to denote we would like for there to be multiple clicks if they are available. Then click “element preview” then “select.” Note that a small input window pops up. If you know the selector you would like to use, you may manually enter it here. Otherwise, the “element preview” option allows you to move your mouse around the web page and see potentially selected elements. You’ll want to start by clicking on the button farthest left in the row we’re trying to select, and then click one button to the right. This should first provide a selector tailored to the first button of this type, but then generalize the selector to call for all buttons of this type. You should see all buttons in the row outlined in red, the visual product of the “element preview” option. One final note, you can specify the number of milliseconds you would like to wait between clicks in the “delay” option box. Particularly as scraping projects get larger or are downloading substantial amounts of information, this is important. Too many requests in specific time frames lead to servers cutting off your connection, or you may get faulty data if you do not allow enough time for each step of the scrape to load. For our purposes i’ll set this to 500, or half a second.
Click “save selector,” and we’ve got our first selector! To recap, this selector will find every button of the type specified, which happens to be the entire top-center row of categories on Wikipedia’s portal page. It will click all of them and load the page. Now to specify what happens on those newly opened pages.
First, click on the selector we just made in the selector screen. Note that we are now in the “/root/button click” segment of the sitemap. This means that whatever selectors we place here will only be triggered on the results of the “button click” selector. These results should be all of the sub pages of the Wikipedia portals page. So to find create and hone our next selector, direct your browser to one of the sub pages through the top menu. I’ll click on culture. From here we can see the initial content section similar to all of these sub pages, as well as the image we will try to scrape on the right. One technique for improving the predictability of this (and all) scrapers, is to first select an HTML element surrounding what we would like to select and then to traverse from that parent element to the element we would like. While at times you may want to select an element that is wholly distinct on a page and thus doesn’t need traversing, oftentimes, the structured honing in on an element through traversal helps keep results predictable.
In this case, let’s create a new selector. I’ll name mine “wrapper” and give it a type of element. Element types for Web Scraper are used to grab any generic section of html that contains elements of varying parts. The child selectors that are passed what is scraped from this element selector will only take information from that element. After toggling “element preview” and clicking “select” you can hover over and click the entire content box on the page we’re looking at. The ensuing selector should read “td > div > div:nth-of-type(3)”. Note that we do not have to toggle multiple as this selector will be separately called on every new page that is opened, and we are just trying to select one “wrapper” element from each page.
After clicking “save selector” we can click on our “wrapper” selector to dig down another level in the sitemap we’re creating. Click to create a new selector that we’ll use to grab the image on the right side of the screen. In this case i’ll title my selector “image” and select the type of image. After toggling “element preview” and “select” you can click on the image in the right side of the content block. Note that the ensuing path to the img is simply “img” as there are no other images within our parent selector that we need to differentiate from. Note on there are options for downloading the image we’ve selected, but for our purposes let’s just scrape the html img element. Once you’ve saved this selector, you can toggle the drop down menu for “sitemap” and click “scrape”.
The scraping for this project should just take a matter of seconds and you should see a popup opening all of the links from the menu clicks. Once the scrape is done, you will be redirected to a table in the web-scraper dashboard that contains the pages the scraper has clicked through as well as the url for the images we sought on each page. You can download this information into a csv, or copy and paste.
Note there are many other features of this scraper. A detailed documentation as well as several videos on different use cases may be found on the home page of the scraper under “learn.” Some final tips that might prove helpful include the ability to grab an unlimited number of elements at any stage of the sitemap. In our last example, we could have grabbed every separate paragraph element, every link, followed every link, obtained the raw html for a section (good for finding hidden email addresses) and downloaded the image. For how accessible this scraper is even to those with limited HTML, CSS, and Regular Expressions knowledge, this is our highest recommended scraper for a wide range of projects. Enjoy!
Tool 3: Scrapebox
Scrape Box is a paid commercial SEO tool known as the “Swiss Army Knife of SEO.” In some circles, Scrape Box has gotten a bad rap due to the large portion of it’s use that was used to automate the posting of comments on blogs. Like any tool, however, it can be used for good (non-spammy) purposes as well. And in this case, scrape box is one of the most powerful SEO and marketing intelligence tools out there. It basically does two things: scrapes search engine results or a list of URLs, and has the ability to automatically post comments. As you might expect, we’re just going to walk through some of the scraping capabilities of scrape box. The automated posting of comments really doesn’t work anymore for SEO or marketing anyway, and can be pretty detrimental to your brand’s image. The first thing you’ll have to do is go download Scrape Box. It’s available for iOS and Windows, though as I noted it’s paid (and not cheap for software). At the time of posting this (and a while before) it’s been on sale for $97, though is marked as having a regular price of about double that.
Once you have scrape box installed and have opened the program, note the four main boxes. Starting from the upper left and moving counterclockwise those boxes include the following: keywords you would like to scrape search engine results for, the URLs you would like to scrape (often from the results of the keywords section to the left), the comment poster, and finally in the bottom left the search engine and proxy settings. In this tutorial, we’ll walk you quickly through three common scraping practices with Scrape Box. Then we’ll turn you over to your own devices with a few resources. Scrape Box has a ton of features, and you can even develop more of your own. So while this is only scratching the surface of Scrape Box, it’s easily the most powerful of the three scraping tools we’ve mentioned in our write up.
Adding Keywords and a Footprint
For the first step, let’s look at the keywords box. Unless you already have a list of URLs that you know you want data from, this is often where you you’ll get the URLs you would like to scrape. It is also a great tool for competitor analysis or finding new potential leads. So if you’re using Scrape Box, you should probably at least try out the keyword features (they’re awesome). Notice that in the keyword section there are two input boxes. The first that doesn’t have labels on either side of it is your “footprint.” Your footprint is something that you would like to appear on every site that shows up as a result. This is used if you would like to only return .gov sites, or WordPress sites, or sites with an address within a certain city. Note that the “Platforms” button opens a list of common platforms that you can use for your footprint. If you only want sites that are WordPress with a certain type of comment box, select them. For our purposes we’ll look at sites that end in .org. Enter “Site:.org” into the footprint bar. The Site: prefix is one of a few common prefixes for the footprint bar. They include:
- Site:yoursite.yours— only returns pages that match the URL criteria, whether a whole domain name or a TLD.
- AllinTitle: What you Want in the Title — only returns pages with all listed words in the title element of the page.
- “Tuscaloosa, AL” — only returns pages that include the text between double quotes.
Start by clicking “Manage” in the bottom left corner of the proxy box. In the window that opens click “Harvest Proxies.” This will open a new window where you should toggle all available sources of public proxies. Click “Start” and Scrape Box will start gathering proxies. This may take a while, but you don’t need every available proxy. Waiting for about thirty seconds as it gathers proxies is generally enough to gather thousands. Hit “Apply” and these proxies will be added to your proxy list. You’ll want to test the proxies before using them, so toggle the drop down menu under “Test Proxies” and select “Test All Proxies.” This may take a while, but if you’re doing a smaller scrape on Google you really only need 10-20 proxies to begin with. Wait until the “Google Test Proxies” notification in the bottom of the window reads somewhere between 10 and 20 then click “Stop.” If you’ll notice the “speed” column, this is registering how many milliseconds it takes individual proxies to respond. Many of them are often quite slow, and using proxies that are too slow will tend to lead to to timeout errors when scraping. So under the “filter” drop down menu you can proceed to “remove by speed” and remove slow speed proxies. This will probably lower your total number of proxies some, but as long as you’re in the range of working proxies we discussed earlier you should be good to go. If you’re planning on scraping Google results, toggle the “filter” and select “Keep Google Proxies.” For other search engines you can “Keep Anonymous Proxies” which will yield a higher number of remaining proxies. In my Scrape Box this had led to a total of 7 remaining proxies, which is an amount that would work for a small scrape. Toggle “Save Proxies” and then “Save Proxies to Proxy List” and you’re good to go! Close the popup window to return to the main screen for Scrape Box.
Generating URLs to Scrape
Next we can use our keywords and footprint to generate a list of URLs to scrape. After the last two steps, this step is simple. First, enter the number of results you would like to scrape under “selected harvester and proxies.” For the sake of this tutorial we’re just going to scrape 10 results. Generally a useful scrape would contain a great deal more. It’s of note that for small groups of keywords, however, often just the first few hundred results are useful or of a notable page rank.
Next head over to the “Url’s Harvested” section of Scrape Box and click “scrape.” This will open a prompt that allows you to choose which search engine(s) you would like to scrape from. Select those that apply and hit “scrape.” If you kept your number of scraped results low, the results should be in almost instantaneously. If you close the results page as well as the “scrape” page and head back to the main page, you can see the newly harvested URLs in the “URL’s Harvested” pane. Next, some choices about what to do with those URLs!
How to Utilize URL Data
Once you have a list of URLs that (presumably) have information you’re seeking to scrape, you have a number of options on how to proceed with Scrape Box. On the right-hand navigation menu the “grab/check” drop-down menu holds a number of common scrapers including the ability to grab emails, to grab phone numbers, to grab META data from sites, and to grab inbound and outbound links. Scrape Box also has a number of free and paid add-ons, which can be accessed by clicking “Add-ons” then “Show Available Add-ons” in the top bar of the program. These will enhance the number of pre-built scrapers at your disposal.
We’ll show the simple process of gathering exposed phone numbers in this tutorial. First toggle the “grab/check” drop-down menu then select “grab phone numbers from harvested URL list.” Once a new window opens, toggle “save URLs with extracted data.” Unless you are sure that every page will result in data that can be extracted this allows you to match up the extracted data with the domains it comes from. Then click “start.” Our short list of URLs yielded two results once it is completed. To see your results click “show data folder” which will direct you to where information from all similar scrapes is held organized by time. If you open one of the resulting files, it should hold a list of URLs paired with harvested phone numbers.
For many purposes, the pre-built scrapers in Scrape Box are fantastic, though the email and phone scrapers only find exposed data of that type, which does not regularly occur. For elements that are publicly available, like inbound and outbound links, META data, article titles and such, the pre-built scrapers are very effective.
If you’re seeking a data type that is harder to come by or hidden to site though included in the rendered HTML, a custom scraper is often the next best solution. Head back to the home screen for Scrape Box and toggle the “grab/check” drop-down menu. Proceed to “custom data grabber” and then “create or edit a custom grabber.” Before we begin, this section of Scrape Box is fully utilized with some knowledge or the ability to figure out Regular Expressions. A cheat sheet on common regular expressions may be found at Rex Egg’s Regex Cheat Sheet.
For simplicity’s sake i’ll show you how to make one of the most general grabbers, a grabber for all HTML on the page that you can then parse through using whatever methods you wish. To begin creating a custom grabber, start by giving the grabber a name for the menu. I’ll title mine “All-HTML.” What I entered for other required inputs may be seen in the image above. Note that again I checked “save URLs with data” for the purposes of eventually moving the scraped information into a spreadsheet. Next hit “save as a new module.”
You will see your new module added to the list in the left. Select your new module by clicking on it. Then click “edit module masks.” Masks are what specify what we will be grabbing from the page. Click “New Mask” and fill give your mask a name (I called mine “All HTML”). We next specify using Regex or “Before_After” format our selectors for data. “Before_After” format is quite easy to figure out with basic HTML knowledge, so i’ll give an example of this sort of selector. In the above example i’ve specific the HTML element I want before what is scraped, and the HTML element I want after what is scraped. In this case we want everything between HTML tags. As some HTML files have specific endings to antag, I’ve only included the start of the tag (“<html”). For the after parameter I’ve just included “/html>.” Next click “save as a new mask” then “save as a new module” on the ensuing screen.
Back on the Scrape Box main page we can now toggle the drop down at “grab/check” and proceed to “custom data grabber.” In this expanded menu we should see our “All-HTML” module (or whatever you named your module). If you click the name of your module a pop-up similar to the phone scraper should appear. Click “Start” and your new custom scraper should begin. As our example scraper was so general, every page resulted in a single entry (basically the HTML of the entire page). Once you have all HTML of pages, there are a variety of ways you can parse the data. By searching with regular expressions in your favorite text editor you can tailor your search to certain tag types, or characters. If you’re trying to scrape all pages of a single domain, you can start by utilizing the “link extractor” (free) add-on for Scrape Box, or by simply adding a keyword in the format of “site:www.yoursite.com” and re-scraping your URL list.
We hope you’ve enjoyed our tutorial, and that it was enough to get you started on your path towards contact information and intelligence gathering superiority! Find more resources on our website including up-to-date rankings on academic programs and certificates for marketing and intelligence degrees.